Prerequisite of this post is understanding the AOT in Visual studio and basic programming language like C#.
In very simple basic level RDP report three objects are required.
Data contract, Data Contract class ties with extended data types. This class contain properties with getter setters. At run time these properties act as report parameters.
Data Provider Class. This class act as container for report logic. Here we get Report Query or parameters of Data contract class and perform queries on required tables. This class is extended with framework class.
Temperory table
Temperory table is used as bridge for data between report designer (DataSet) and Report logic. We populate temporary table with required logic in data provider class.
Report Requirement:
Client wants a report where End user select Customer and Report shows, Customer Name, Sale order Number, Item Id, Item group. Sales order Quantity, expected delivery date of Sale order and Unit Sales price. The report must be print in A4 paper size.
Mapping:
So our first step is to create mapping. This mapping contain following things.
- Expected field Name
- Description / explaination / expected values
- Orignal table field, which we read and map to temporary field.
- Extended data type. You can get it from original table field. This is optional, but good in the case of create links and length of fields in table.
So build following table with our requirement and generates mapping.
| Report Column | Description | Dynamics 365 for operation Mapping | Extended data Type / Base Enum |
| Order Number | Sales Order Number | SalesLine.SalesId | SalesIdBase |
| Item Number | Item Number | SalesLine.ItemId | ItemIdSmall |
| Item group | Item Group | InventItemGroupItem.ItemGroupId | ItemGroupId |
| Sales Price | Sales Price | SalesLine.UnitPrice | SalesPrice |
| Open Qty | Order Line Quantity | SalesLine.QtyOrdered | InventQty |
| CustAccount | Cust Account | Salesline.CustAccount | CustAccount |
| CustName | CustName | CustTable.Name() | Name |
| Date Requested | Ship date requested | SalesLine.ShippingDateRequested | SalesShippingDateRequested |
| Order Status | Sales Order Line Status | SalesLine.SalesStatus | SalesStatus |
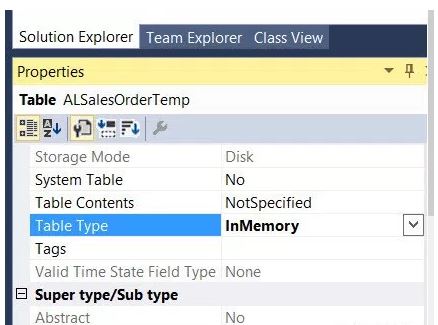
Now create temp table in Visual studio


Now double click on table in solution explorer and open it designer mode in center of screen.
Update its Table Type property to InMemory.
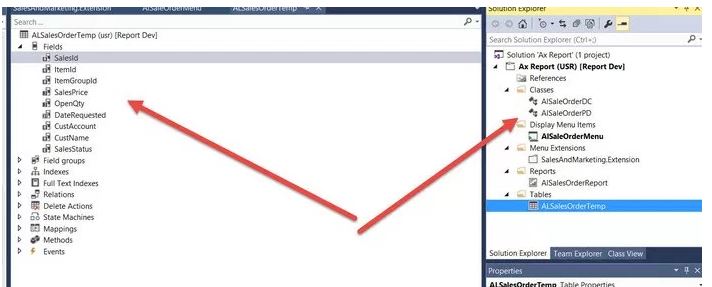
Now create each field and update its extended data type as we created in previous step.
Now next step is report parameters. For this purpose we use Data contract class. In current report we required only one parameter base on Extended Data Type CustAccount. At simplest our data contract class will be look like as follow.
[

DataContractAttribute

]

public class AlSaleOrderDC

{

CustAccount custAccount;


[

DataMemberAttribute('CustomerAccount')

]

public CustAccount ParmCustAccount(CustAccount _custAccount=custAccount)

{

custAccount = _custAccount;

return custAccount;


}


}
Now we required to write some logic which you above mention class as its data contract and populate the custom temp table we build in pervious step.[ SRSReportParameterAttribute(classStr(AlSaleOrderDC)) ] public class AlSaleOrderPD extends SRSReportDataProviderBase { AlSaleOrderDC dc; ALSalesOrderTemp salesOrderTemp; [ SRSReportDataSetAttribute('tempSalesOrderDS') ] public ALSalesOrderTemp gettempSalesOrderDS() { select * from salesOrderTemp; return salesOrderTemp; } /// </summary> public void processReport() { CustAccount _CustAccount; SalesLine _SalesLine; dc =this.parmDataContract(); _CustAccount = dc.ParmCustAccount(); while select * from _SalesLine where _SalesLine.CustAccount == _CustAccount { salesOrderTemp.SalesId = _SalesLine.SalesId; salesOrderTemp.CustAccount = _SalesLine.CustAccount; salesOrderTemp.CustName = CustTable::find( _SalesLine.CustAccount).name(); salesOrderTemp.SalesPrice = _SalesLine.PriceUnit; salesOrderTemp.ItemId = _SalesLine.ItemId; salesOrderTemp.ItemGroupId = InventItemGroupItem::findByItemIdLegalEntity( _SalesLine.ItemId).ItemGroupId; salesOrderTemp.OpenQty = _SalesLine.QtyOrdered; salesOrderTemp.DateRequested = _SalesLine.ShippingDateRequested; salesOrderTemp.SalesStatus = _SalesLine.SalesStatus; salesOrderTemp.insert(); } } }At this step build the solution, never forget to check the project Sychronized database on build set to true.Now Add new report in projectDouble click on Report in solution and open in designer screen. And right click on datasets and create new Data Set.From new data set update the following properties. Data Source Type to Report Data provider. Change Name to DSSales OrderClick on Query and from dialog select the data provider class we create some above screen.After Selecting Class, click on next button. From next dialog select field for usage in report.Now right click on designer node of report and click on precision design.In precision design, we can create report designer by our need.New designer will be added, rename it and double click to open it. from left pane, toolbar to drag to table to add in designer.From Report Data drop dataset fields on table columns. Add new column in table.When all fields are added in report. Right click outside the report body and click on report property.And select report print layout. Our target is A4 page. so set it from report properties.Now right click on report body and check its with. Its width must be under 6 because at run time 1 inch on both side must be skip.After that right click on report in solution explorer and click on deployAfter the add new display menu Item update the its following propertiesHere there is one advancement, In 2012 there is very difficult to debug report. But in Dynamics 365 for operation is its very simple. Just put break point and set report as starting object and run the project.Now new browser window you find similar form.Now Customer appear because by default it opens in “DAT” legal entity. Now update the url as follow.select parameter from customer. click on okAnd my break open hitSo it is very here to debug report.So our report logic fine, but one step is pending Which is report should be run from Client with particular module.So I decide to add this report in sales and marketing module and under sale order report . For this purpose we have to create a new menu extension.New menu extension added in solution explorer.Expand menu extension in designer and drag display menu in required menuFrom property update “Display In Content Area” to true to create show crumb bar.Now save and compile again the project.And open client url in BrowserLogin and goes in Sales module For identification purpose, I set the label of display menu as “All Sale Order”.Click on it find report parameter dialogSo our report is running successfully.


Comments
Post a Comment